‘Painting floor tiles before and after’ was a comment we received from one of our blog readers who was contemplating painting her bathroom floor tiles. She never knew tiles could be painted. When she got the information from one of our blog posts that talked about the best paint to use ceramic tiles, she picked interest in painting her bathroom tiles but wanted to see before and after photos of painted floor tiles.
Table of Contents
Before and After Images of Painted Floor Tiles
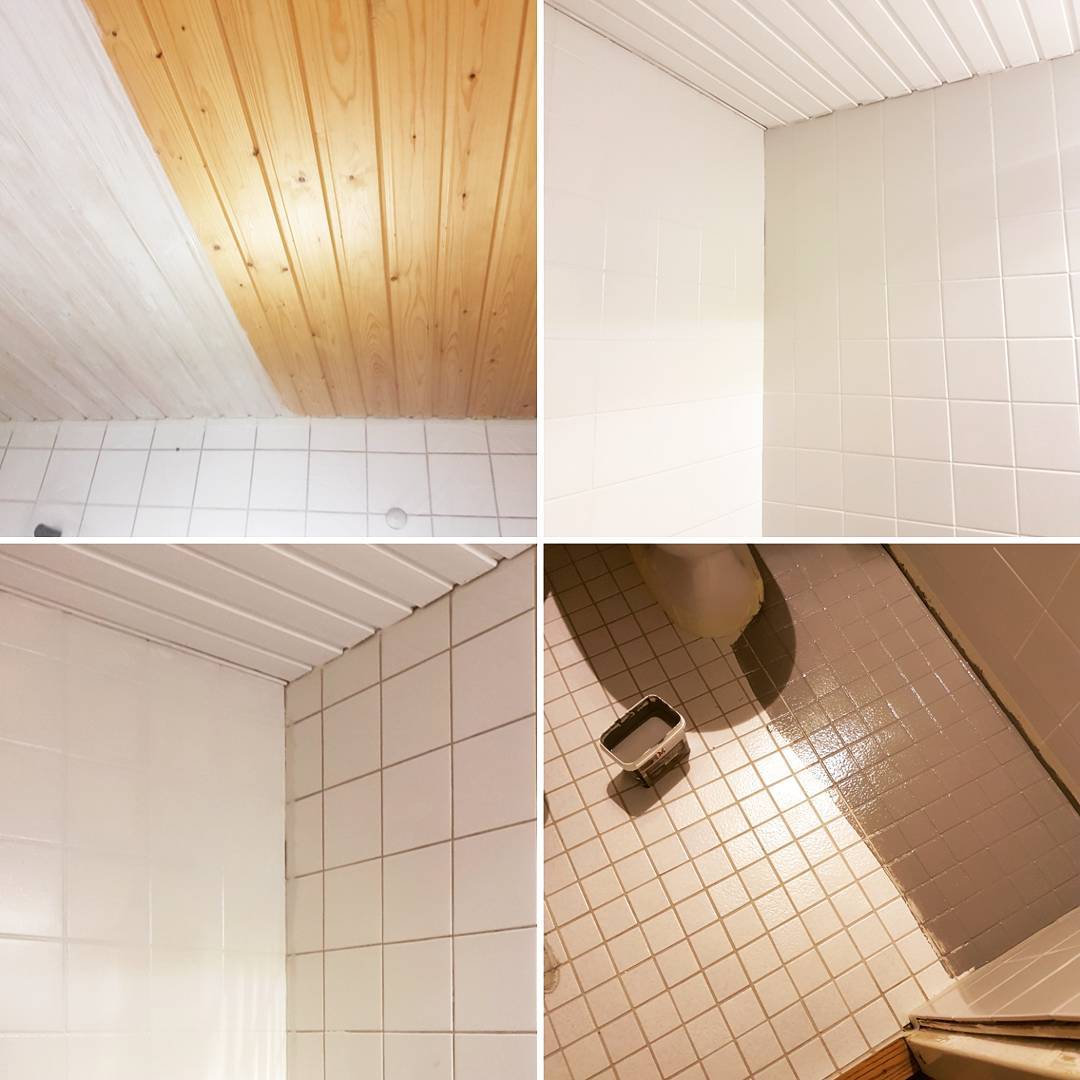
1. The before and after image below was made and shared by bktfulloflove.

From the painting floor tiles before and after above, you’ll see how the floor was transformed from what it used to be to something else. This is what you can do with paint. You can give it any design, look, and color of your choice. The picture was shared by bktfulloflove on Instagram and said:
It is done. Over the past few weeks, I have been painting my bathroom tiles and today finished the floor. It has taken longer than I had hoped, but I have had to for it around the day job and other commitments. But it is done. Topcoat is drying, and I have a well earned G&T in hand. Perfectly imperfect.
Bktfulloflove turned what use to look like woodlike tiles into a stenciled design on the bathroom floor. If you wish to use this type of stenciled design for your bathroom floor, ensure to start with an excellent surface that is evenly coated and sealed. The tiles need to be painted correctly, while the grout needs to be sealed perfectly. Allow the paints to dry before applying any stenciled design of your choice.
The present look of bktfulloflove bathroom is super friendly. I bet someone that used that same bathroom a few days before it was painted with such stunning designs may find it difficult believing that it is the same bathroom used the last time. Kudos to bktfulloflove for doing such a fantastic job.
2. The step by step painting floor tiles before and after images below was designed by terrace_on_warwick


The painting floor tiles before and after image above were shared by terrace_on_warwick on her Instagram handle, where she explained how brave she was in doing such an amazing job in her bathroom. She transformed what used to be black tiles into an outstanding design. She did well by sharing the step by step photo of how she was able to achieve the clean painting she did. According to her, she said:
My labour of love #bathroomfloor Still can’t believe I was brave enough, but what’s the worst that can happen? It’s only painting, and if I can’t manage that, I probably shouldn’t be teaching design to kids.
Terrace_on_warwick, you are courageous for doing such clean painting on your bathroom floor tiles. Hopefully, some may see this design and pick interest in giving his bathroom floor tiles the same design.
3. The painting floor tiles before and after images below were made by rosie_byrne

Rosie_byrne transformed what use to look like a grey tile into a stenciled design. It seems like stenciled designs are the most famous painting designs for bathroom floor tiles. The reason is no other than the fact that the designs are beautiful. It is a modern design that can make your bathroom look very refreshing and elegant. No wonder rosie_byrne said;
“Before vs after!! Amazing what a bit of paint can do.”
From her bathroom pictures, you will see that the before paint did not compliment her bathroom vanities more than the after paint did. The white designs conform to the white colors in the sink, bathtubs, and many more.
4. The painting floor tiles before and after pictures below were designed by creationsbyjams


Creationsbyjams did an excellent job by turning what used to be a woodlike, yellowish color into a fantastic black design. No wonder he said;
I was a floor painting fool yesterday!! I’m really in awe of the power of paint and patience.”
Even though the before paint complements his bathroom vanities, the black design gave the bathroom a unique luxurious look. It also complements his bathroom cabinet. The black color complements the cabinet, while the white star designs complement the colors of his sink, toilet seat, etc.
Even though dark colors bring negative energy when used in a small bathroom, creationsbyjams’s bathroom still gives positive energy because he followed the rules. I remember stating in one of my articles about painting bathroom floor and wall the same color to match that you are not supposed to use dark colors for a small bathroom except to mix it with lighter colors. creationsbyjams followed the instruction, and as you can see, his bathroom looks luxurious.
5. The before and after floor tiles paint below was shared by refined_bytara


Refined_bytara transformed what used to be a typical plain tile into a unique stencil design. Apart from the fact that the new design made the bathroom look amazing and luxurious, it also made the bathroom look virtually larger or more expansive than it used to be. This is what painting a bathroom can do for you. Refined_bytara posted the before, and after pictures on her Instagram handle and said,
Making these dull bathroom tiles shine one stencil at a time. Thanks @cuttingedgestencils for making the best!”
You can use the same stencil design as refined_bytara, but make sure to follow the procedure to achieve a better result.
6. The painting floor tiles before and after images below were shared by s.l.f_home


s.l.f_home turned what use to look like a cozy ugly floor tile into a fantastic design. She shared the before and after image on her Instagram handle and said:
The stenciled floor is finally done!
I decided after spending hours on my hands and knees on a cold hard tiled floor, it deserved a square of its own on the grid. I’m so pleased with how it’s turned out, swipe across to see the tiles before (which I know weren’t that bad, but they just made the room feel so cold and dark and made it even smaller than it is!) now I just need to sort the rest of the house out which have all somehow been turned upside down because we’ve been doing the bathroom,
She even went ahead to share how she did the painting works and the materials she used. According to her:
To do the floor, I used:
- X2 coats @zinsser_uk BIN primer white
- X3 coats @zinsser_uk All Coat White
- stencil from @thestencilstudio
- grey paint is Greyhound @frenchicpaint Al Fresco
She said she is going to seal it but haven’t got round to doing that yet. You may want to change to check her Instagram handle for more information.
7. The painting floor tiles before and after pictures below were shared by ourkidlingnest.


Ourkidlingnest transformed what used to look like an old tile into something brand new. The bathroom’s old tile color seemed very old and entirely off from the other painting colors in her bathroom. I keep telling people to get a tile color that complements the colors in their bathroom vanities. The new paint color did not just make her bathroom look fresh and beautiful; it also complements other colors of her bathroom vanities. According to her;
My BIG little project this weekend!
I spent $3.80 this weekend on this project. Everything else I already had on hand—stencil included. Compare that to the penny tile I want that’s not in our budget.
So I’ve been planning on doing this paint project l for a few months, and this weekend provided the perfect situation to get it done! The last time I painted, I got a good round of eczema—this time is no different, unfortunately, but I’m ignoring it best I can.
The main bath still needs more work—a new countertop, shelves above the toilet, possible wall paint job, and more. But it sure feels like it’s brighter, newer, and less 90s style.
It’s not at all how I thought it would look, but I’m so very pleased!
Worth the eczema
The painting floor tiles before and after pictures below were shared by michellenoellej.


Michellenoellej shared her bathroom tiles before and after pictures and narrated how difficult it was for her to do the job and how long it took her to do the job by herself. Let michellenoellej story be a lesson to us. If you know you are not very good at painting or have not done it before, get a licensed painter or someone who has done such work in the past to do the job for you. It won’t cost you much. According to michellenoellej, she said;
These before and after pictures of this DIY project I did are a classic case of social media only showing the good!
What these pictures do NOT show is that this project was WAY more difficult than I thought and it took well over 6 months to complete! Check out my story today for all the details and to vote on other elements I need your help with.
Advantages of Painting Floor Tiles
- The best thing you can do when you are on a budget is to paint your tiles. It will save you lots of money with which you would have used in buying new tiles.
- With the paint, you get to choose any color combination of your choice for both your bathroom floor and wall.
- You can also choose any design of your choice. Whether a stencil design or just a plain design. With the paint, you are no longer limited to the number of designs and styles you can use for your bathroom. Just get a color suitable for tiles and use it to design your tile floors to your satisfaction.
- It is cheaper than buying new tiles for your floor.
Disadvantages of Painting Floor Tiles
- Painting floor tiles has its disadvantages which I would like to discuss with you. The floor tiles will look good, but it’s only a matter of time; the paint will either wash away, peel, or have bubbles. When this happens, the floor will not be as beautiful as it is used to be.
- You have to be painting the bathroom at least every 2 to 3 years to maintain the fresh luxurious look you desire for your bathroom.
However, when you notice that the paint is washing off, peeling, or having some bubbles, do not panic. It is something that is bound to happen. Paints are bound to wash off after some time. Maybe two years, four years, depending on how often the wall is exposed to water or moisture. That is why it is vital to use paints for ceramic tiles on your bathroom floor because they are made to resist moisture and last longer for you.
Conclusion
From the various images discussed above, it’s obvious that bathroom floor tiles can be painted. All you have to do is make use of the paints suitable for tiles and follow the procedure to apply the paint on your bathroom tiles. You can choose any color of your choice, but when selecting a paint color, ensure the color conforms with your bathroom vanities. If you like stencil designs, you can go for it to make your bathroom look luxurious and refreshing.


Leave a Comment